Friday 31 December 2010

Happy New Year!


Just a short post to wish all my family, friends and readers a Happy New Year, not long of 2010 left  to say good bye to old father time and prepare for the arrival of the fresh baby new year 2011. I hope you have all had an eventful year, and will join me in raising a glass in toast to all the challenges and adventures that may lay ahead for us next year, whether they be big or small, hopefully some steps will bring us closer to the life we dream. Thank-you also to all the wonderful people who have inspired us all year.


We had such fun in December making our own decorations, some of the natural pine cone ones are above, some of the others I have already posted about. It was a shame to pack all the decorations away, but this was done with great care so that we could hopefully enjoy them all next year again, and start the new year afresh.


The whole family got involved making our Christmas cards too, I hope everyone who received one liked them. The paper quilled one above was made using the snowflake pattern and some of the others are below. What matters most to me is the fun we all had making them. We even made our own crackers, complete with hats, jokes, toys and snaps. 


so good bye 2010 and I'll see you all on the other side 2011. Happy new year, blessings to you all.

Thursday 23 December 2010

Velvet Christmas sacks

I finally took the plunge and did something I had been putting off for more years than I can remember, I cut up my Grandmothers old, very heavy red velvet curtains! I can see you all thinking that I went to my grandmothers house and attacked her drapery but NO, I had the curtains in a drawer for years, we have never used them but they were too good to throw away. I decided to make Christmas stockings / sacks for the small children as a family keepsake, a memento of all the wonderful Christmas times we have had together.


The above photograph is what I have ended up with, I have made 2 largish sacks on my new sewing machine. We have used Christmas ribbon as the drawstring, although we may change this for cord at a later date. I have also stitched on a snowflake and a few sequins to symbolise the snow that we have had this year. As these sacks are so sturdy they will last forever and I intend to add something new to the decoration every year as a sort of ongoing project to reflect us as a family. Next year I'm thinking that I may sew their names on in a Christmassy way.


This is how the fabric looked a few days ago, It is so heavy and a really stiff fabric, I did bend one needle sewing them, but I'm not that experienced at sewing. If I had more of this fabric it would have made a perfect cape or bodice it really is that thick. I used a simple method to make the bags hemming, sewing a channel for the drawstring then sewing all round the edges.


Here is a photograph of the finished bag with something inside, definitely cord next year I think. I'm pleased that we were able to recycle some old fabric into something that will hopefully become special to the children because lets face it little ones as young as mine are usually only interested in what's inside the sack. It's only when they get older they appreciate all the love you add to these little touches that make Christmas special.

Tuesday 21 December 2010

Solstice Blessings


                   Wishing you all winter Solstice Blessings and a very magical Yule!

Saturday 18 December 2010

Remember to feed the birds

  It may seem like an obvious thing to say, but it is so cold and has been snowing a lot and some of our garden friends may have a little trouble finding food and water. Throughout the winter we ensure all our feeders and the bird table have a good supply of many different types of food the children have even helped make some bird feeders and they really enjoy watching the things each type of bird will take.


  I took this photograph in our garden today, the children were very surprised to see a blue tit's tongue, not something you see everyday. If you click on the photograph it will enlarge, so that you can see it's tongue close up. I think the nuts look a little frozen though. This is not only helpful to the birds and a way of giving back to nature but it is also educational and a great way to really study the garden visitors.


We have been wondering what happened to this starling today, it is difficult to see in the photographs but it looks like it has a strange hump on the back of it's neck, maybe from an injury. It's feathers stick right out at right angles sometimes and don't go flat.


Here it is in another photograph, it looks quite odd but the bird had no trouble feeding or flying, so it can't be seriously hurt. I did notice in another photograph that it had a toe missing too!

 It doesn't have to cost a lot of money to feed the birds either many of the things on the RSPB list are kitchen leftovers, as you can see here. If you want a guide to see how to make some bird feeders and also some other photographs of our garden birds see my husbands blog here.

Thursday 16 December 2010

Origami Tree cards

Just a quick post to show you what I made last night, we are making all our Yule / Christmas cards this year and we are going to be trying out many different styles, some for us and some for the children.


 Last night I made this card for someone, it had to be posted so I wanted to get it done quickly, it was my first attempt at an origami card, those of you who follow me on twitter will know I failed miserably to make an origami paper crane for my husband on our 1st wedding anniversary (paper). So although this is quite easy I am still very pleased with it. If you would like to try out this card there are many guides on line.  Happy folding.

Sunday 12 December 2010

Paper Quilled Snowflakes

As home educators, we hope to provide our children with the opportunity to try as many different and exciting arts and crafts as we can fit in over the years, with the aim of finding the ones the children love most and wish to continue with. Some of this enthusiasm has also rubbed off on us and this season I have tried out the art of paper quilling.


I found a free guide on a craft site, which looked very self explanatory (link at the bottom of this page) and my husband made me a quilling tool from a cut down needle stuck into a piece of wood, isn't he lovely! We then used the paper shredder to get the strips of card or paper to the correct size. I used the card we use to make greetings cards from as I wanted my snowflake to be sturdy enough to go on the tree.


The snowflake was sprayed with silver paint and glitter spray, which made it a little stronger, and matched the colour scheme of my tree.


This is a photograph of my finished snowflake, with ribbon added so that it will hang on the tree. I really enjoyed making this and I think it looks beautiful hanging on the tree. You could also fix the snowflake to the front of a home made Yule or Christmas card and wow the recipient. My eldest daughter has also tried it out, although she has taken it a little further and created her own designs.


 My daughters remind me a little of fractals, these are also waiting to be put onto the tree. The art of paper quilling has a long history which you can read about on this site.  If you would like to try this very relaxing craft out for your self and create these beautiful snowflakes for your tree you can find the guide here. My husband has done a guide for making your own quilling tool which you can see here.

Friday 10 December 2010

Tree and Star


Finally got the tree up, well, mostly up! We still have some decorations to go on the tree which are in various stages of being made, painted, glittered or drying. Some of them I'm quite excited about and will be writing about them soon but at the moment this is how far we have got.  This photograph doesn't do the tree justice, it is so sparkly in real life. I have to admit to being a little obsessive with the tree and getting it just right, I don't know why because after a few days it always looks like it has been attacked by several bears.


 This is one of the stars my husband made to adorn our ceiling, it looks so beautiful reflected in light, it has also been sprayed with silver paint and glitter. I was originally going to make these with holographic paper to be more reflective but I think they look OK. So as you can see we are a little bit closer to being ready... if you would like to make the above star you can find a guide on this site.

Tuesday 7 December 2010

Yule log and door wreath started


Time is moving so fast, I'm really behind in the seasonal preparations, I've managed to get the Yule log inside and partially decorated as you can see in the above photograph. The wood has been carefully selected to reflect our current situation and my husband has made a hole for the candle. I have decorated it with small clippings of holly and ivy from our garden, I need to add a few more things but for now that is as far as I have got. I was hoping that other family members might add a little of something they like, my daughter did add a couple of white pebbles and a drawing of a four leaf clover but she has since moved them on somewhere else. I will post another photograph when it is finished so you can see the end result.


  This is our door wreath, I got the basic ring with the circle of twigs for a pound locally about six years ago. It has lasted very well and I still really like the simplicity of the twig style ring but this year I thought I would enhance it slightly with nature. I have carefully wound in a couple of trimmings from our garden of holly and ivy, I could have gone overboard and made a huge holly wreath but I really love my little holly bush by the front door and would much rather it stayed alive. I intend to wire on a few more pine cones as we have loads of these and maybe some fir tree clippings too, but so far I'm quite impressed with my handy work, definitely OK for hardly any cost. I will post another photograph of the end result so you can judge for yourself.

Sunday 5 December 2010

Pine Cone Trees

   This is the first of our Yule / Christmas crafts this year, little pine cone trees. It is very easy, so even the smallest of the little folk can try this one. We always find ourselves with loads of pine cones this time of year, collected from many nature walks and displayed on our seasonal nature table. So finding something to use them for is always on my mind.
 

   First, the children selected a good shaped pine cone and painted it green, these were then left to dry while we prepared the pots. Anything pot like can be used here, (bottle lids for example) but we have used old cotton reels and wrapped a piece of sparkly paper around them. My husband then glued the two together as you can see in the above  photograph.


   The next stage is also very easy, though a little messy, adorn with your chosen decorations. As you can see above my children have used as many sparkly things as they could find, totally raided the craft cupboards. We dabbed with glue then added sequins, jewels and glitter, of course! My daughter even found a different way of getting sequins and glitter on the little trees, smear with glue and roll the pine cone in them, seems to have worked well.


   I think the final effect is very magical, they look so cute on the window ledge. The children had a really good time decorating the little trees and are quite impressed with their craft work. This craft can very easily be adapted to suit any age child and we hope you have as much fun as we did making them.

Quick Update

    December has roared in with lots of snow and freezing cold weather, and for the last week or so we have been stuck inside due to stomach bugs and bad weather. Only venturing outside to play with the snow in short bursts as it is so cold. We have been getting ready for the Yule / Christmas craft sessions and choosing which things we will try to make. Very exciting stuff!


   I still haven't improved much with the crochet, I made the above headband for my daughter, but not much else. I think maybe using the cheap wool that has been in the craft cupboard for years is probably not a good idea, so before I carry on with more I'll probably buy some of the good wool.


     With the onset of bad weather our thoughts have been with the birds that visit our garden, my husband and the children have been busy making bird feeders from coconut shells as you can see above, and various other ways of feeding the birds. If you would like to read more on our bird feeders you can check out my husbands blog here. Last year we made bird treats by rolling pine cones in peanut butter then in bird seed, which they loved, both the birds and the children.


   My husband has also been making lots of these little wooden plaques for me, various designs and all from recycled materials. Isn't he handy and thoughtful and just plain lovely. If you would like to read more about these and see all the other designs have a quick look here .
   
    Well, that was a very quick round up but I will be back here very soon with some of our Yule / Christmas crafts. We are intending to make as much as possible ourselves, some hand made things make the season much more magical and will bring many lovely memories for future years.

Sunday 21 November 2010

My Son's Surgery

   A year ago now, when he was 5, I mentioned to the Doctor that something wasn't quite right with my son's feet, half expecting him to lecture me on the pros and cons of having the correct fitted footwear. But to my shock he referred us to a specialist at the hospital as he didn't think they were quite right either! The specialist confirmed there was a problem, he had a condition called Pes cavus but informed us that there would be an underlying cause, it's just a matter of finding out what that was. A MRI scan followed to see if he had a spinal tumour or a deformity but he was given the all clear. This has been a very scary time for us all, as you can imagine.

casts

   However, he would need immediate surgery on his feet, due to lack of muscle formation and an overly taut tendon underneath his foot. The high arches in his feet would just continue to get worse, they already seemed to curl right up. After much anguished thought, discussion with Doctors and internet research (which didn't have many answers) the surgery went ahead in the spring. They also took a biopsy from his calf to test for the most common causes of pes cavus.
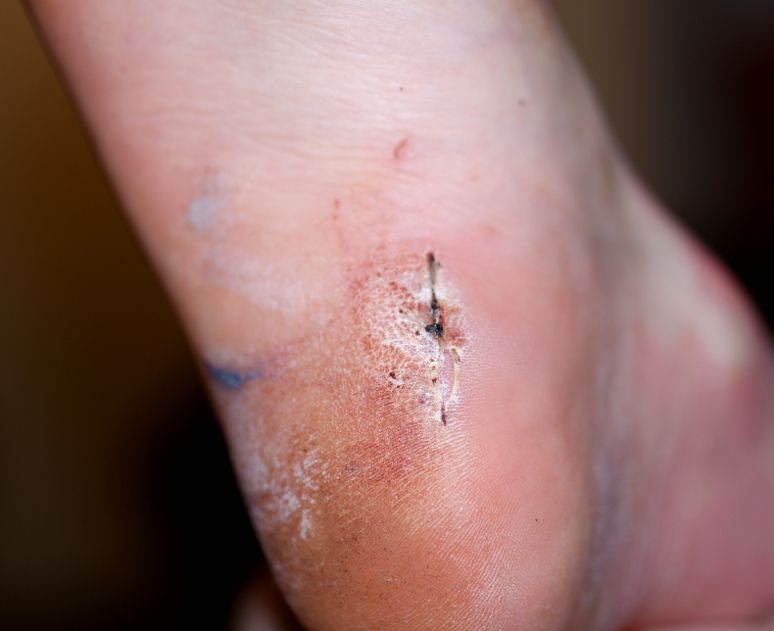
biopsy

After three weeks of hobbling around, the casts came off and for the first time we could see the scars left by the surgery. Above is the biopsy, these photographs were taken immediately after the casts were removed, before washing, so the redness on his skin is from the surgery.

left foot

This is the bottom of his feet, above is the left foot and below the right foot, as you can see from the photographs his feet still curl up especially the left one, poor little man has been in a lot of pain too.

right foot

  The Doctors seemed very happy with the results, but advised us that he would need many more surgeries in the future. The biopsy was inconclusive, so we still do not know what has caused this problem, the specialist remains convinced that there is an underlying cause and is talking about the possibility of further tests and electrical testing of the muscles some time when he is older. 

   The last few months have been very stressful, my son has had to get used to walking a slightly different way on his "new" feet and he has had a lot of pain when he over exerts himself. Something the Doctor said troubles me too, he said "make sure he plays football, climbs trees and has fun now..."  is it just his way of saying he is fit to go and live life to the fullest or that he may not be able to do these things in the future...?  It has had me wondering and worrying every day since the operation.

    I just wish we had some idea of what we are facing, not knowing is awful, so I have written this post not only to let you in on our lives but also in the hope that we could connect with other parents who may have already been through or are now going through similar problems, so that we can share experiences as we found so little information on the internet regarding this problem.


Thursday 18 November 2010

Happy Birthday


Today is my husbands birthday, so I would just like to pause for a second to say Happy Birthday to him, I hope your day is as magical as your presence has made my life. I love you for all time, a true soul mate xx 

a love that even time will lie down and be still for
-quote from the film practical magic


This is the birthday cake I made today, with the childrens help, of course, the leaves are to symbolise his love of nature and gardening. It is filled with the wild plum jam we made from foraged fruit and to top of the evening we had a glass of our own homemade blackberry wine. perfect.

Tuesday 9 November 2010

Pond Dipping


   This year we went pond dipping twice, the children love spending time with nature and we have spent a lot of time exploring this as a part of our everyday life this year. The possibilities for learning are endless and so is the fun. We went pond dipping in the Spring and again in the Summer, this post is a little late as we were going to go again in the Autumn, to record any seasonal changes, but time just seems to be flying by and the weather has been really bad. As you can see above my daughter caught herself in the net, by the look of the big smiles this was also fun!


   We chose a spot within walking distance of where we live, which just happens to be a country park, nature reserve and educational centre. This little bridge seemed the perfect spot, so we used the same place for both trips. Don't worry no creatures were harmed and all were returned safely to the place they were found. well, apart from the tiny red worm... which got eaten by the demoiselle larva... but that's just part of a natural life cycle.

spring

   Above are a sample of the water creatures we caught on our Spring pond dip. we didn't catch as much in spring but I have put on a photograph of some of the bigger things, a demoiselle and a true damselfly larva.

summer
    As you can see the summer pond dip caught many more water creatures than the spring one. Still the same sorts of things just many more of them. More larva and definitely more snails. On the summer excursion we also noticed that there were many empty skins of the larva on the bridge, where they had left the water, shed their skins and flew off.

    My son has really been enjoying all the time we have spent in nature this year, it is one of his biggest interests, so we intend to continue with more time spent exploring nature and the natural world around us. He has picked up so much this year, as it is a subject he loves so much, not just about the creatures and their life cycles but also food chains / webs, evolution, environmental science and habitat conservation, plus so much more in between. We intend to start a nature journal in the new year, to record as many things as possible from our area as they change throughout the year. A record to keep forever.


Thursday 4 November 2010

Remains of the Pumpkin


We have finally got through the rest of the pumpkin flesh that was scraped out of the lanterns made for Halloween. I made this spicy pumpkin soup with a difference... as it was a spooky time of year I have added a dumpling to the bowl, to give a hint that it may contain brains... not really!  A small amount of crispy bacon and onion has been added to the top for added flavour (or just onion for vegetarians) It made a very warming dinner.


 We also made pumpkin scones and these were so yummy they were all gone within minutes of coming out of the oven. I used my home made pumpkin puree for these replacing any liquid I used in the scone recipe. It was a bit of an experiment as I hadn't made these before, but it was a very big success... and that was the last we saw of the little Halloween pumpkins... Till next year (insert evil laugh here).

Saturday 30 October 2010

More Halloween Preparation


My husband carved the pumpkins today, as you can see above, what do you think?... scary enough? He tries to carve a different face every year and I think he's rather good at it. Last year he did Jack Skellington, he also likes to carve something in the back so that you get the shape projected onto the wall behind, this year he did bats. A little added magic for the children. With two pumpkins there is a lot of pumpkin insides to be removed, and we like to make use of as much as possible. I started off by collecting all the seeds and tossed them in a little oil, salt, pepper and cajun spices, these were then roasted for us to snack on.


The pumpkin flesh that was scraped out we have divided in half. One half I've kept to make soup, the other I've cooked and made into a puree to use to cook other things with. Today we made pumpkin pie, or should I say pies, as the recipe we used had very big portions.


This was really nice and as there are two pies we will be eating it again tomorrow. The children have been enjoying all the Halloween preparations, especially all the crafts.


They have made this banner, I wanted to make a fabric one to keep forever but ran out of time so they have made the banner using Halloween shapes, colouring them in and sticking the pumpkin faces on. So today has been another very busy day full of baking and crafting.

Bats and Lanterns.


   More Halloween crafts, this time we have decided to make lanterns in the style of the sleepy hollow ones, only much more child friendly. The lamp on the left is a faerie lantern that my children bought for me (we didn't make this one) the one on the right is the one we made. we chose some stiff black board and made sure it would fix around a jar. Using a jar ensures that your cardboard doesn't burn and your tea light candle is held safely. We cut out our Halloween picture from the card and fixed a piece of tissue paper to the rear of the cut out shapes. Orange in this case to match the pumpkins waiting to be carved.


  Once this is completed you can roll your cardboard into a cylinder and fix it, we just used tape. then put your cylinder over the jar with the tea light inside. wait until after dark and light the candle. This will definitely wow the children and provide a spooky atmosphere.  A really eye catching lantern for our display. We will be keeping ours out of reach of our youngest children for candle safety reasons.


    I really love bats and no Halloween display is complete without bats, the above bats were very, very simple to make. We love to recycle as much as we can so we cut the bat shapes out from the crinkly black paper covering that comes in chocolate boxes. this gives them a slight 3D look and they make a crinkly noise when you touch them. Once cut out, the children stuck little sequins on for eyes so that they catch the light... added spookiness. Then they were hung onto a hanger using fishing line and left in a doorway to brush against the face of an unsuspecting passer by.


   We had some bats left over and didn't want them to go to waste so these were positioned on the wall as if they were just flying past. So as you can see we have been really busy, these are just a sample of the things the children have been making.

Thursday 28 October 2010

Spider webs for Halloween


 Halloween / Samhain is one of my favourite holidays, I love how spooky the house looks with broomsticks propped up by the front door and witches hats hanging on the hat pegs in the hallway. All cobwebs in the house get a reprieve for a few days and the smell of pumpkin lanterns wafts through every room.

    The children have been really busy crafting scary things for Halloween, we have had to find crafts suitable for a 2 year old to join in because she absolutely loves everything crafty the messier the better. Yesterday we made cobwebs with great, big hairy spiders in them. Do you think they look spooky or just rather cute?


    We have used conkers to hold the wooden skewers in place as we have many hanging around thanks to our Autumn collecting, but you could also use large crafting polystyrene balls, clay or indeed anything round you can find. Then the conker was covered in glue and rolled in wool that has been cut up very small so that it was all fuzzy. Pipe cleaner legs were added and googly eyes. The web part was very simple to make as you can see, it is easy to wind wool around the skewers. This does tend to slip a bit if played with too much, so some discrete dots of glue would hold this in place if you choose to.


 They are now ready to hang up on the wall to scare people for Halloween. My husband also helped our son to make a PVA glue cobweb. He drew out the web shape in glue on a laminate sheet and left it to dry overnight. Once dry it could be peeled off the laminate sheet, and stuck on a window. The thinner you can get the web the better here as it tends to spread out a little, but it looks very effective.