Friday 28 October 2011

Halloween Paper Quilling

As Halloween is approaching fast we thought we would have a go at some seasonally inspired paper quilling choosing a bat and pumpkin to try and quill. First you need a quilling tool and paper, I use a quilling tool made for me by my husband, I will put a link at the bottom of the page if you would like to make your own tool and we have used a paper shredder to shred the card for quilling.


Start by making a spiral and this is done by rolling the paper around the quilling tool as seen in the above photograph, continue until all of the strip of paper is tightly rolled.


Remove your coil from the tool and allow it to loosen to the desired size, you should be left with a spiral like the one above. Once it has loosened enough put a spot of glue on the loose end to fix it and you are ready to mould it to the shape you require.


For the bat's body I allowed the spiral to open up quite a way to give a larger shape then squeeze the bottom until it has a point like the one shown above.


Then squeeze the top down while holding the shape firming on each side, this will give you the heart shape shown above. Once you have achieved this shape pinch the two top points or ears as they will become, this will make them more bat like.


Next you need to make four semi circles, all shapes start as a circle on the quilling tool, then the above shape is made by pinching both sides downwards. The more you pull it down, the more pronounced the bat wing shape is.


Once you have your body shape and four semi circles you can glue them together like the above photograph shows to give you the basic bat shape.


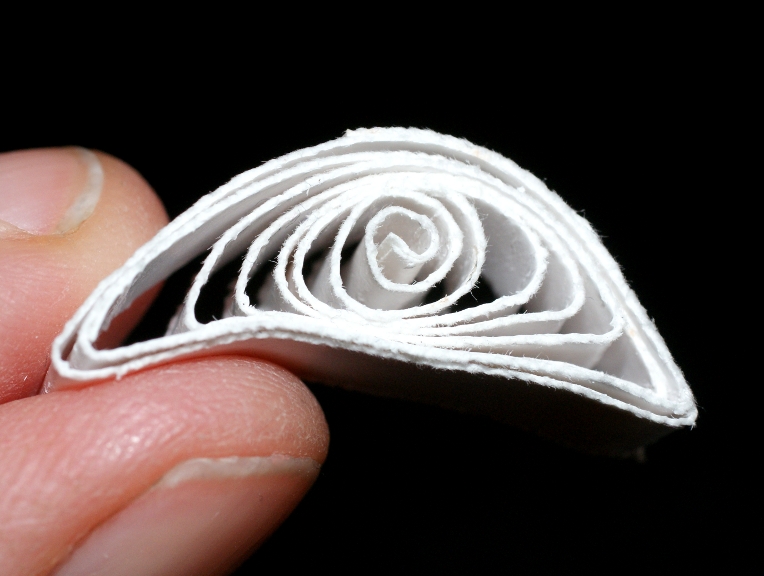
For the pumpkin you need to make another two semi circle shapes and one eye shaped one, which is made by just squeezing both sides of the initial circle. These three shapes then need to be stuck together, with the eye shape in the middle.


We have pinched the top of the middle shape to make the stalk of the pumpkin and added a small curl of paper to represent a vine. what do you think?


If we had used coloured card for the quilling we would be finished now but unfortunately I only had white card so we had to paint our quilled shapes. The bat was spray painted black and googly eyes were glued on and the pumpkin was brushed lightly with acrylic paints to give a hint of colour. We are going to add thread to these to hang them up for Halloween on our haunted tree.

This craft can also be done by children, my son who is 7 years old is always very interested in having a go at quilling, today he made the pumpkin seen above on the left and is very happy with the results. My daughter who is only 3 years old also enjoyed having a go, she made some lovely spirals around a pencil. If you would like to make your own tool my husband's guide is here.

Wednesday 26 October 2011

Halloween Paper Banner

Halloween / Samhain is almost upon us, it is one of my favourite holidays and it always ends up the one I have the least preparation time for, with it being exam season. Every year I say I will make fabric banners so that we can re use them but time just runs out, so this year I have made an easy paper banner.


This is one of many dictionaries we have in the house, it is old, battered and broken with many missing pages. It was only fit for the recycling bin really but I am always reluctant to bin things that may have other uses, so I have been using it for crafts. Making gift boxes, paper flowers, for drawing and painting on in an altered page style, journalling and mixed media art and herb labels to name a few things, and now this banner...


First you will need to ready your printer and find a font for your spooky writing, then just print the letters out onto your old pages. The above pages were just used as test sheets to get the printed letters in the right place and to work out the size of the flag, once you are happy, mark and cut out the shape of the flag. I decided to age the paper to give it a spooky vintage feel by dabbing a used tea bag around the edges of the flags.


As you can see above the tea bag leaves an old brown mark, good for making treasure maps too. Then fold the top over a piece of wool or string and glue down, I have used a glue stick here as it is just paper.


That's it... one completed banner, just hang it up. You can really go to town here if you want to, as long as the printer will print on your old paper you could print in colours or spooky pictures.


My husband also made a banner making the lettering look a little spookier than mine as you can see above. He has printed out the letters with added cobwebs, bat wings, ghosts and some kind of splatter effect.


This is a close up of one of his pages, we decided to make these flags a slightly different shape to the first ones but they are fastened to the wool in the same manner.


 This is what both banners look like on the wall, it should enlarge if you click on it. This is an easy paper craft all letters and pictures could be painted or drawn on if you have no printer. It is also very easy for small children to paint their own banner for a Halloween party centre piece and hang spooky things on it.

Monday 17 October 2011

A Little Vintage and The Cat Returns!

I haven't done a Magpie Monday post for a while and this is one with a slight difference, I have not had much time for shopping and have just been trying to buy things I really need or like. Firstly I found this tablecloth with lovely Autumnal colours for just 75p, the colours actually remind me of the ones used in some of the Clarice Cliff designs. The only tablecloths we have are the modern plastic ones which are very useful for messy crafts and some given to me by my Grandmother, which are too special for me to introduce to the children just yet, so this will come in useful. I am not sure whether to keep it as a tablecloth or use the fabric for something else but so far my daughter has been using it for picnics with her dolls.


Next is a couple of wooden cotton reels I found, I had to pay 50p for these but I do love the wooden ones and the colours are very pretty.  They are now taking pride of place on the top draw of my sewing basket.


I found this bowl or saucer for 25p, to be honest I really don't know what it is, but I liked the simple lines of it, maybe it was an under saucer for a plant pot?... I bought it for my cat, not for normal cat food but for the special treats he gets like a little tuna or chicken.


This bowl is now back in use after 4 months as my cat sadly went missing at the beginning of June, but I am pleased to announce he is now home, he just strolled right in like nothing was wrong the other day. We are all very surprised and happy to have him safe at home again.


Lastly for today I have a glass lemon squeezer my husband found for me for just 50p, we had an awful modern plastic one which did not work well and I really have no idea where it came from anyway. I love these glass ones, so easy to use and they catch the pips... I now have plenty of little volunteers for lemon squeezing.


This post is for the magpie Monday series hosted by missielizzie.


Me and My Shadow

Friday 14 October 2011

Dinosaur Park

The last couple of weeks have been so busy my feet have barely touched the floor, I have been meaning to update on here but time seemed to just fly by. We have had a mini heatwave and we have taken full advantage of this lovely Autumn weather and been out for many day trips, the children have had so much fun. Firstly we went to the Dinosaur park, an old favourite that we have to visit every year as my son is a huge dinosaur fanatic.


This year was slightly different as they had built a new indoor play area with large slides and the children were extremely excited to try this out. Even my youngest daughter braved all the slides and thought it very funny to be completely buried in the ball pit, we found her by following the giggles.


There were not many other children there when we went as the school term had started, so we got to hold some of the small animals like the guinea pigs and even stroke a bearded dragon. It makes the day a little more memorable when they get some hands on experience.


My son is admiring the dinosaur timeline which is all around the room, he was so fascinated by this that he has decided to make one for his bedroom, it will be a nice little project for him. Just thought I would leave you with a photo of another monster we have had growing in the garden this year, one of our sunflowers reached 10 feet and had over 30 flower heads on it, grown and cared for entirely by the children.